Blending Images in Photoshop
Learn The Art of Blending Images in Photoshop For Beautiful & Natural High Dynamic Range Images.
Learn The Art of Blending Images in Photoshop
Blending images in Photoshop is a popular technique used by landscape and travel photographers. It’s also used by photographers doing architecture, environmental portraits, including wedding photographers. So, whether you’re looking to blend multiple exposures from the same place and time, or composite images (replace skies). The tools and tips below and at ADP LumiFlow will help you achieve your goals.
We have created a large number of free video tutorials below. These tutorials show many methods for blending images in Photoshop. We talk about replacing graduated filters in the field with two exposures in Photoshop. How to replace skies, creating perfect selections for blending. Even how to deal with the bright lights of the cities, which can blow out in our images.
Often the blending of images can initially be overwhelming. We also show tutorials on using our automated tools, allowing you to blend up to 7 images. If you’re new to luminosity masks and blending images you may want to start with our video workshop. Our Luminosity Video Workshop teaches you in detail the creation and use of masks in your workflow.
Section Guide
ADP LumiFlow Plugin For Photoshop

What is Image Blending / Exposure Blending?
Blending images is typically referred to the combining of two or more exposures in post-production. This is typically done to overcome the limitations in the dynamic range of our cameras.
Dynamic range: is the cameras ability to capture, without loss of detail, all of the highlights and shadows in a single frame.
If a camera is not capable of capturing the full dynamic range of the scene, you will need to bracket your exposures in order to capture all of the details. The best way to ensure that you are capturing all of the details is to use your in camera histogram as a guide.
Exposure may not be the only reason you would blend images, other examples may be:
- Replacing the sky with one that better represents the feel of the image you desire. This can apply to any type of photography with a sky.
- Combining aspects from multiple images or composite image making.
- Blending colours from other images, and more…
Throughout our tutorials, we touch on all these topics, with a strong emphasis on the blending of multiple bracketed exposures, and the replacement of skies.
Getting the Images, You Need for Blending Images
Shooting Techniques for Bracketing Exposures
Sometimes, lighting conditions make it difficult for you to correctly expose a scene because the dynamic range of the scene is too wide to be captured by the imaging sensor. In this case you would bracket your exposures and then blend them together in post-production.
Exposure bracketing means that you take an exposure, and then bracket for under (-) or over (+) exposure by a set number of stops. Example: Take an exposure, then another exposure at +1 stop and another at -1 stop.
Section Guide
There are two methods that you can typically use with most modern camera to take multiple exposures, AEB (Auto Exposure Bracketing) or Manual Exposure Bracketing. With Auto Exposure Bracketing you are setting your camera up to automatically take a pre-determined set of exposures. With Manual Exposure Bracketing you are adjusting the settings between each shot. Below you will find the techniques to do either type.
Before you start bracketing your exposures though, you need to determine if you will need to bracket your exposures at all. Turning the live view on in your camera and bringing up the live histogram you can see where the tonal information is for the scene.
Assessing the Scene
Use the steps below to determine how many stops are required for your imaging sensor to capture the entire dynamic range of the scene, ie. where you are not clipping any details in your highlights or your shadows.
- Turn on Live View and set your ISO and Aperture to the settings you want for the scene.
- Bring up your live histogram, so you can see where the tonal information is.
- Adjust the shutter speed until you are not losing any detail (clipping) in your highlights.
- Adjust your shutter speed (longer) to expose for the shadows. Revealing the shadow detail until you no longer have any detail lost in your shadows (clipping). Count the number of times you clicked the shutter speed dial between a correct exposure for the brightest highlights and darkest shadows.
- Each 3 clicks of your shutter is 1 stop of light.
After you have determined how many stops there are between the highlights and shadows, you now need to determine how you’re going to capture those images. Below are your two options:
Exposure Examples and Blended Image
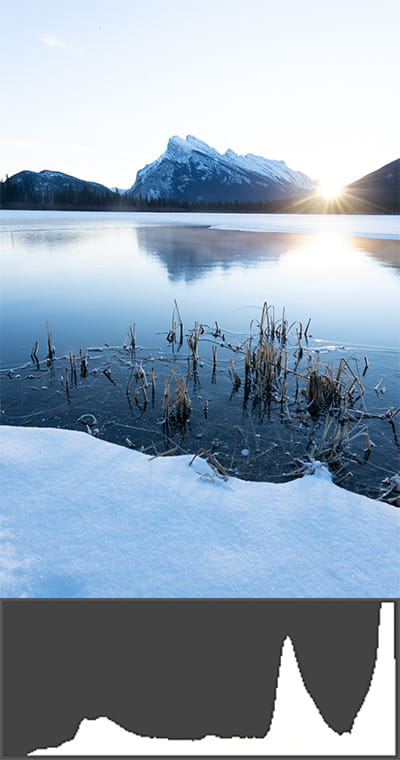
Exposure For Shadows
- Sunflare
- Snow in Foreground
- Light on Reeds
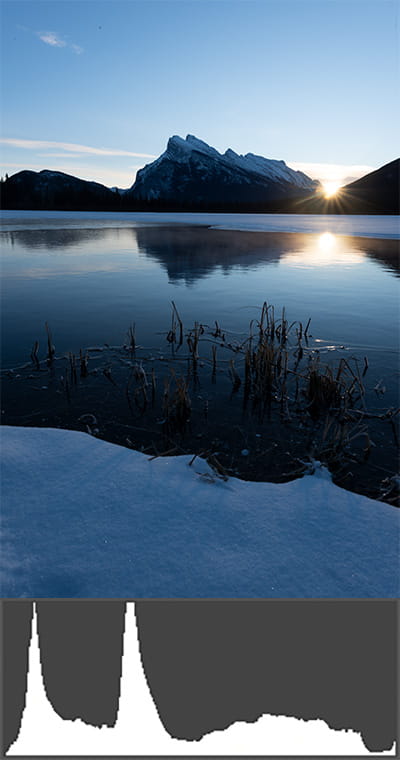
Exposure For Midtones
- Partial Sunflare
- Snow in Mountains
- Mountain Details
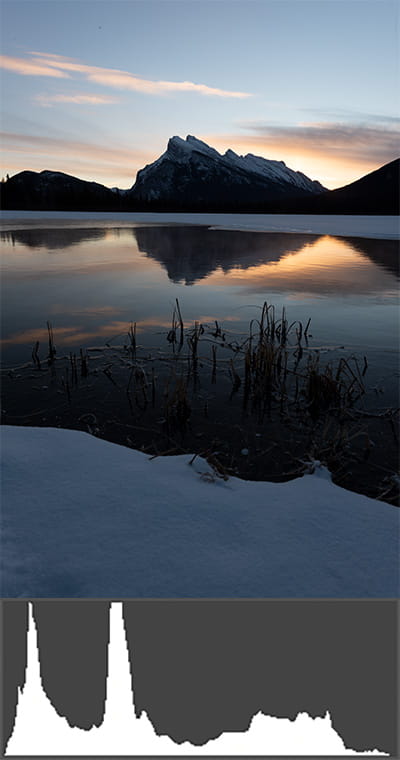
Exposure For Colour and Cloud
- Clouds
- Reflections of Clouds
- Warm Tones
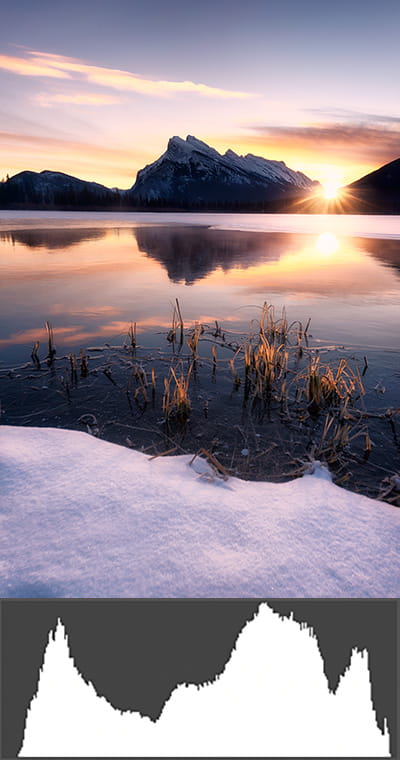
Final Blended Image
- Tonal Balance
- Desired Details Featured
Auto Exposure Bracketing
In most modern SLR’s you have the option of how many images are captured in a brackets series (3, 5, 7 or 9) and the amount of stops between exposures from 1/3rd to 2 stops or more. Typically bracketing 1 stop between exposures captures a greater variety of exposures, giving you greater flexibility in post processing on which exposures to use in your final image.
- Turn on your Auto Exposure Bracketing
- Choose the number of exposures you want to capture, base this number on your test of how many you need “Assessing the Scene”.
- Choose the number of stops between exposures, typically 1 stop.
- Set your initial exposure (shutter speed) to the middle exposure between the highlights and shadows. The reason for this is, most cameras will capture the middle exposure first. For example, if you set up a 5-exposure bracket, your camera will capture the middle exposure then +1, +2, -1 then -2. If you don’t set your exposure to the middle, it won’t capture the scene as you expect.
Manual Exposure Bracketing
Manual exposure bracketing is a technique used where you take a photo at each exposure setting as you manually adjust the shutter speed.
To take your exposure manually follow the exact same techniques you used to assess the scene. Instead of clicking from the highlights all the way to the shadows:
- Take a shot when you’ve exposed for the brightest highlights.
- Adjust your exposure 1-stop (or 3 clicks) towards exposing for your shadows and take another shot.
- Repeat this step until you have properly exposed for you shadows.
Using this method ensures you’ve captured the entire dynamic range and minimised the number of shots you’ve had to take. If you choose to use this technique, ensure you have a very stable tripod, this will ensure that there is minimal movement between exposures, as you have to touch your camera between shots.
Creating Bracketed Exposures From 1 File
This is a technique that I have seen some people use, but is not ideal, and provides little to no advantage. This involves taking a single exposure, creating duplicate files and then increasing and decreasing their exposures, so they can all be blended to together. The only benefit of this technique is it will give you the opportunity to practice blending images.
The problem with this technique is twofold:
- If you have lost details in the shadows and highlights on the single exposure, you cannot recover them, simply by changing the exposure in post.
- If all of the information is in a single file, then you should be able to edit that single file, without having to blend.
Shooting for Details, Colour or Story Telling
We’re not always taking images purely for exposure blending, but we want to capture other additional details to use when blending images. These are not limited to, but can include:
- Long exposures of water, such as waterfalls and rivers, or waves rolling onto a beach.
- Clouds streaking across the sky.
- Remove movement of items such as leaves and branches on trees blowing in the wind.
- Darker exposures to capture more detail in clouds, or to capture the richness in the colours.
- Lighter images to bring out more details in the shadow areas of the scene.
- The streaking of car lights on the highways and roads.
These are just a few examples of additional exposures that you may take, to use while combing your photos in post to tell a story. It’s extremely rare that a surreal image you have seen has been captured in a single frame. Many have been captured in multiple frames, using different techniques, and possibly over several hours.
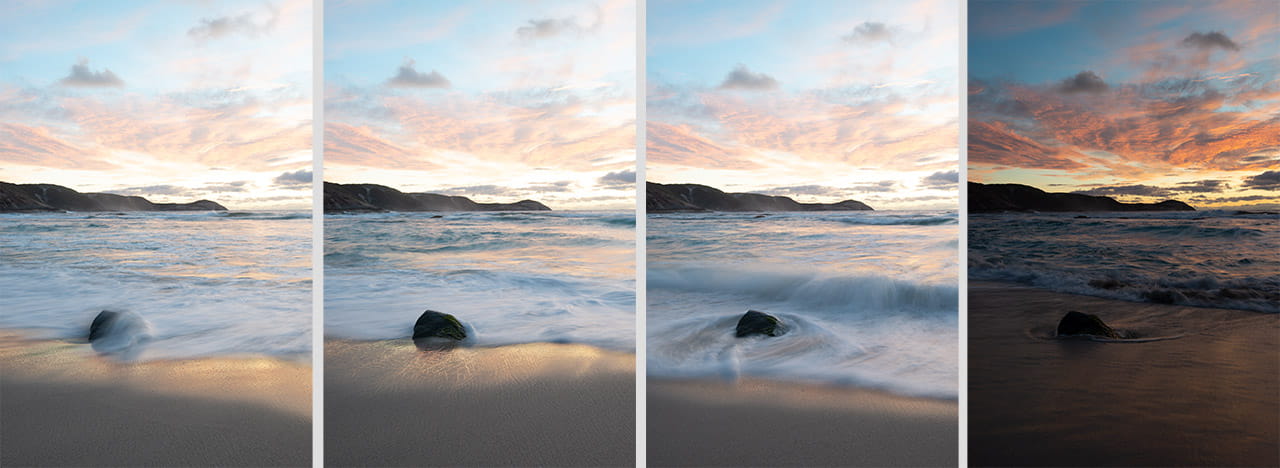
Example: Shooting the sunset on the beach. Take many different exposures to capture the movement of the water, until you have the perfect shot. Then change your exposure and capture the colour and sky. Now you can decide which wave motion works best and blend it with the sky image. This allows you to concentrate on the most important part, the foreground, rather then bracketing for the sky over and over.
The three images on the left are shots of the motion of the water. The shot on the right is the 1 exposure taken for the sky.
Processing Tools and Preparing for Blending Images
The tools available on the market for blending images is long, but they’re not all created equal. Firstly, before we get into the tools, we need to understand exactly what they are doing. Although there are many options, there really is only two methods, and even they are similar.
Section Guide
HDR Software (Automated Image Blending)
HDR software or automated blending tools vary in the algorithms that they use to blend images together, but they all perform the same function. They take your exposures, and bring all of the available data from each into one file. This then gives you all of the exposure information from each of the images, to manipulate in a single image.
Although this sounds good in theory, in practice, editing these files can be challenging. By combining all of the information, often our shadows, no longer resemble shadows, and our highlights no longer resemble highlights. Our images end up with so much detail, that they are overwhelming to view and edit. The other issue that can arise is hyper detail in the midtones, leading to crunchy (over sharpened look), and over saturation of colours. With some effort, you can manipulate the data in order to regain your shadows and highlights, and maintain natural colours.
Some provide preset adjustments that can help in creating in a natural image, with varying success. But, more often than not, you will find yourself fighting the detail.
Manually Blending Images in Photoshop
The second and much more effective and natural method of blending images is to do it manually. The only downside is that it requires a little more effort. But, if you know your way around Photoshop, it can actually be pretty simple. This method of exposure blending gives you the ultimate control over where details are blended.
With manual the manual blending of images in Photoshop, you have the say in which areas of the image get detail added, and not the software. Instead of bringing in hyper detail to all parts of the image, you can apply it where it’s needed. This gives you the ability to create more natural images with greater impact.
This technique involved staking images into layers in Photoshop. Then using layer masks, revealing the areas of each of the images, until you have a final blended image. Of course, you can create the hyper detailed image, by blending in too much detail. But, with some practice, and greater understanding of what you want to achieve, your results will be much more pleasing.
This is the technique that we focus on throughout this article, and the video tutorials provided.
Stacking your images
Before you can blend images, you’ll need to stack them into layers in Photoshop. This can be done in one of four ways.
- Load them manually, by opening the files independently in Photoshop, then copy and paste them on top of each other.
- Load them automatically using Adobe Bridge.
- Select the images you want to load as layers
- Go to Tools > Photoshop > Load Files into Photoshop Layers….
- Load them automatically using Lightroom.
- From the library module, select the images you want to load as layers.
- Go to Photo > Edit In > Open as Layers in Photoshop
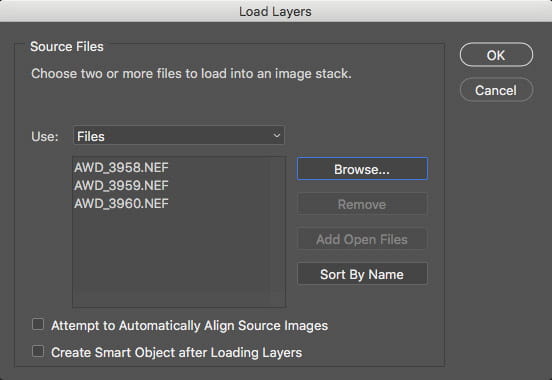
- To load them as layers from within Photoshop. This can be done either with files already open in Photoshop, or with files stored on your computer.
- Go to Files > Scripts > Load Files into Stack…
- Browse to select the files that you want to load. If they are already open, choose the “Add Open Files” Note: if you are loading files that are already open in Photoshop, those files will need to be save before Photoshop will allow you to continue.
- Before you continue, you have an option here to “Attempt to Automatically Align Source Images”. I prefer to do this after I’ve loaded the layers, in case it doesn’t work as planned. If you do it here, you won’t be able to undo the alignment and you’ll have to load them all again.
Now all of your images should be loaded as layers in Photoshop.
Aligning Your Images
Misalignment of your images is a result of camera movement while taking your images. Before you begin blending images in Photoshop, you should align them, otherwise you’ll run into difficulty. Below are some of the reasons you may need to align your images:
- You touched your camera between exposures (manual bracketing).
- Your tripod wasn’t stable, or shifted during the shot.
- It was a windy day, and your camera and tripod shook.
- Your shots were taken hand held.
These are just a few examples. Of course, there would be many times you’ll work in ideal conditions where you won’t need to align your images. Also, you should check your images after aligning them to ensure that Photoshop did it correctly, it is fallible. The easiest way to check is to zoom in on areas of detail and lower the opacity of the layer until you can see both.
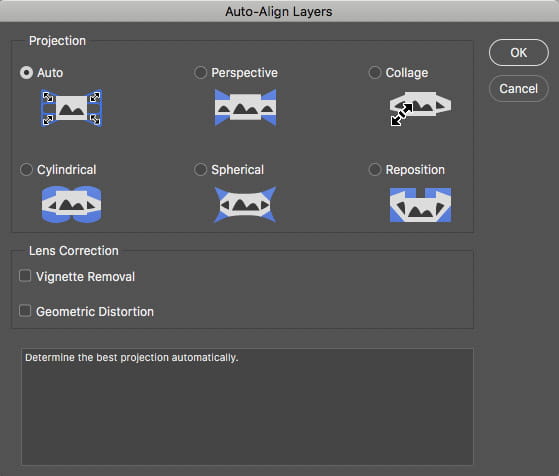
To use the automated tool in Photoshop to align your layers, use the following steps:
- Select the layers you want to align. Select the first layer, hold the Shift key, and select the bottom layer.
- Go to Edit > Auto-Align Layers
- Choose the Auto method and press OK.
- Check by lowering the transparency of layers, to make sure alignment has been achieved.
Techniques for Blending Images in Photoshop
To key to blending exposures in Photoshop is in the use of layer masks. Through the manipulation of layer masks, we’re able to reveal details on specific layers. This allows us to combine the details from multiple images to create one final image. The tools that we have available to us are limitless, like most things in Photoshop. But, we’re going to focus on a few of the most effective methods to blend images.
Section Guide
Gradient Filter Method
Blending images in Photoshop can be as simple as using a gradient filter. This technique is no different to using a gradient filter in the field, except you’re doing it in post-production. In the field, you use a graduated filter to able to exposure for high dynamic range scenes. By blocking the light from the bright areas, you’re able to expose for the shadows and bright areas in the same exposure. Although this can be an effective method, there are reasons it may not be desirable:
- Objects protruding above the horizon, or above the graduation in the filters, are darkened. This causes an unnatural look.
- They can be cumbersome and time consuming to fit to your camera and use.
- The larger rectangular and square ones, catch the wind and cause additional camera shake.
- Most people typically carry 3-stop grads, which means that you don’t always get the correct exposure.
- They can be inconvenient to carry with you, especially the larger ones.
- They are expensive and get damaged very easily.
The effect of using a graduated filter in the field can be replicated in Photoshop in just a couple of seconds, and requires very little to know post processing skill. The added benefits are:
- You can change the positioning of the filter at any time.
- Change the strength / density of the filter, for infinite exposure possibilities.
- Paint away the areas that protrude above the horizon, stopping them from unnaturally darkening.
Applying a Gradient Filter
There isn’t a set order that your images need to be stacked in order to be able use a graduated filter to blend images. You can have the light image on top and dark below, or vice versa. My preference when blending images using this method, is to have the light image on top, and dark below. Use the following steps:
- Load and stack your images in Photoshop.
- Align your images, if required.
- Place a layer mask on the top image layer (white mask).
- Select the gradient tool:
- Change your brush colours to black foreground and white background. It’s not overly important if they’re the other way around. You can invert the mask after, if it’s been done in reverse.
- Select the Linear Gradient from the option bar.
- Set Mode to Normal, this should be default, and your opacity to 100%.
- Left click above your horizon line, hold and drag below your horizon line and let go. The area above where you initially selected, with paint the mask black, showing the image below 100%. The area between where you selected and dragged to will be a fading transition to white. Similar to a graduated ND filter. This will fade the revealing of the image below. Everything below where you let go, will be white in the mask, keeping the detail from the top image.
Below are your options for modifying your blended image
- Adjust the positioning of your graduated filter. Click on the link between the image and layer in your layer stack. This allows you to move the layer mask independently of the image itself. You can now move your graduated filter up and down and get in the perfect position. Click between the mask and image to link them together again.
- If you’re not happy with the mask angle or transition distance, redo it. You don’t need to delete the mask. With your graduated filter tool selected, just follow the same process you did above when you created the initial filter. It will over write the current filter.
- Change the density of the mask (black area). Double click on the mask to bring up its At the top of the properties window you’ll find a slider called density. By lowering the density of the mask, you can modify how much of the image below is revealed. Therefore, changing the density of the graduated filter.
- Lower the opacity of the top layer. By lowering the opacity of the top layer, you can darken the remaining light areas of the image. This will help in creating a more balanced exposure.
- Paint away the areas that protrude above the horizon, or that were darkened by using the graduated filter. This can be done in several ways:
- Using a white brush with the gradient filter mask selected, paint away the areas that were darkened. This can be tricky though, as the painting will often bleed into the light areas and cause halos.
- Make a selection of the areas that were darkened using the quick selection or magic wand tool. Then with the mask selected, paint away the areas that were darkened with a white brush. This method is more accurate the option 1, and in situations where you have strong clear edges, can be very effective.
- Make a selection of the darkened areas using luminosity masks. This is very effective, especially when the selections have very fine details, such as trees and branches. Then, using a white brush, paint away the darkened areas.
As you see it can be a very effective method of blending images in Photoshop. I still own graduated filters, but I rarely carry them into the field anymore.
Blending 2 or More Images Using Luminosity Masks
Using luminosity masks is a very powerful method of blending images in Photoshop, allowing you to bring fine details through from multiple exposures. The great benefit of this method over HDR software, is you get to choose what parts are taken from each image. This allows you to easily keep shadows and highlights in your image, creating images with greater impact.
Preparing Images For Blending
The order that you complete blending images is up to the individual. You’ll develop your own preferences and methods with practice and time. In this section I talk about the method I typically use to do my image blending.
- Load and stack your images in Photoshop
- Align your images, if required.
- Place the middle exposure on top. Or, in the case where you are blending just two exposures, the image with the most information that you’re going to keep.
There is no hard and fast rule about what you blend first, you can either choose to blend for highlights, or blend for your shadows. This means, deal with the highlight areas first, or deal with the shadow areas first. My preference is to deal with the highlight areas first. So,
- Place the image exposed for the highlights (the darker image), below your middle exposure.
- Put any additional images, either further exposed for the highlights, or shadows, at the top of the layer stack, and turn them off. Later, we will turn them on, 1 by 1 and use them as required.
Blending Options
If using the graduated filter method of blending images would work here, you can use it to blend the images. To purely use luminosity masks, you have a couple of options, either apply a luminosity selection directly as a layer mask, or paint in the areas you want using a selection. By painting you have much greater control and you can choose the area you want to blend. Below are the techniques for each option:
Option 1: Apply a Luminosity Selection as a Layer Mask
When you apply a luminosity selection to the entire image, it will work similar to using HDR software. It will apply the effect to the entire image. Although it’s not exactly the same, as you do have control over what that mask looks like. So, you can manipulate and restrict the mask to work in the areas you want to affect.
- Create a mask to reveal the areas you want. Because we’re going to be applying this mask to the top layer, we want the mask to be black in the areas we want to reveal. Having said that, if you’re more comfortable making a luminosity selection with whites, that is fine as well. You can invert the mask after it’s created.
- With your selection complete, create a mask on the top layer.
- If you mask has revealed the opposite of what you intended, invert your mask.
Option 2: Paint in the Areas You Want to Reveal
By painting in the areas that we want to reveal, we have complete control. The control is not only on areas that we want to blend, but also how much of those areas get blended.
- Place a white layer mask on the top layer.
- Create a mask, selecting the areas that you want to hide to reveal the image below. Because we will be painting in the areas we want, this selection can be broader. We won’t be painting in the areas that we don’t want.
- Load your selection (marching ants). Turn off your marching ants CMD + H, so they are not distracting you as you paint.
- Click on the white mask you created earlier and select a black brush. I tend to work with a lower opacity brush, 20% – 40%, and with 0 hardness, for feathered edges.
- Start to brush in the areas you want to hide, to reveal the image below. To bring more through, paint over the areas multiple times, until you reach your desired blend.
Blending the Remaining Images
Regardless of how many images you have, the image blending process described below, is the same for each one. The premise for the remaining images, is to blend in that parts that you want from each of the images.
- Put the image at the top of your layer stack.
- Create a black mask to hide the layer. You can do this by holding Alt or Option and clicking the create mask icon. Or, you can create a white mask and invert it.
- Create a luminosity selection, that targets the areas that you want to blend in. For example, if there are shadows that you want to lighten, create a mask that is white in those shadow areas.
- Select the black mask, on the layer that has the information you want to add.
- With a white brush, start to paint in the areas that you want to reveal from that layer. I typically work with a low opacity brush, around 20%, and low hardness, 0 – 10%. This will allow you to slowly bring in the information. It will also allow you to bring it in at different amounts throughout the image.
- Repeat this process for any additional images you want to blend in.
Blending Images in Photoshop using Blend If
Using the blend if function in Photoshop to blend images is comparable to using luminosity masks. In fact, the way the blend if function works, is identical, and will assist in keeping your files sizes down as you don’t create masks. The upside, is also the downside. Because you don’t have masks to work with, manipulate and modify, you don’t have complete control over the areas blended.
So How Does the Blend If Function Actually Work?
The easiest way to understand how it works, is to open a couple of bracketed exposures as layers in Photoshop. Once they are open, double click on the grey area of the top layer, to the right of the image and mask if there is one. This will open a pop up window called “Layer Style”.
At the top of this window you’re going to see items such blending modes, layer opacity, fill, etc. These are no different to the options you have for each of the layers in your layer stack, so I won’t discuss them. At the bottom of the window there is a section that starts with a pull-down menu called “Blend If”.
Blend If
This pull-down menu allows you to blend your images based on specific colour channels, or RGB. Different colour channel, can often give you a better starting point for some blends, depending on what you want to achieve. The Gray option is the standard selection and incorporates all of the Red, Green and Blue channels.
Slider Information
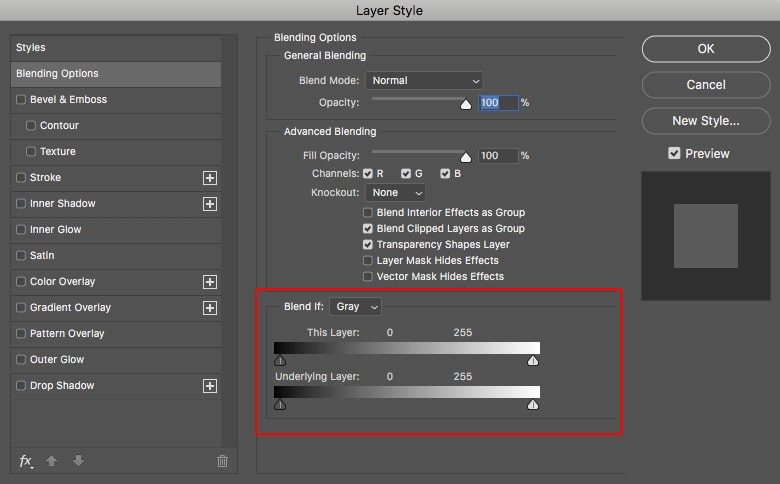
Underneath the Blend If function, you’ll find two sets of sliders titled “This Layer” and “Underlying Layer”. These are the sliders that you use to tell Photoshop how you want the layers to be blended.
The left side of the sliders represents the shadow areas, and the right side represents the highlights.
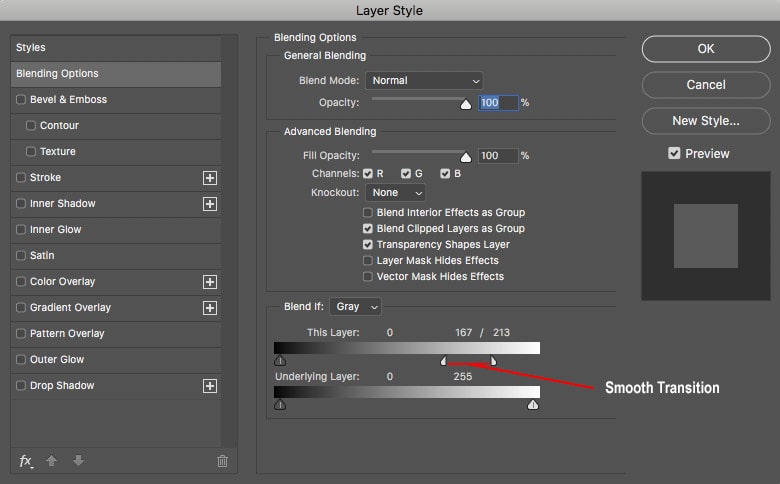
In each of those bars, you see two sliders, a black and a white slider. If you look closely at the sliders, you’ll also see a thin white or black line down the middle of them. You actually have the ability to break that slider into two pieces. When you slide a slider, it starts to blend, with a hard edge. If you reach a point where you want that edge to start smoothing out with cleaner transitions, you need to split it.
Holding CMD or ALT, left click on the slider. This will break the slider into two pieces. Now when you slide the inner of the two pieces, you’ll see the blending start to have smooth transitions. If you touch the two broken pieces back together, they will re-join and slide as one.
Blending Images in Photoshop Using Blend If
Now that you understand how the tools actually work, you can start using the sliders to blend your images.
- Select the layer you want to blend with its underlying layer.
- Decide what you’re looking to blend. Do you want to hide the light areas, to reveal the darker areas below, or vice versa.
- Slide the appropriate slider to start to reveal the information.
- When you reach a point where it’s blending the majority of the information you want, split the slider in two.
- Slide the inner slider to smooth out the blended area. Note, you can adjust both sliders here if you don’t have it quite right.
- If you’re not finding it working like you imagined, try using the underlying layer for your information instead.
As I mentioned previously, this will use that tonal information through your image, and blend it. You don’t have the ability to pick and choose, you can only choose the tonal range.
Wrap Up
As you can see there are many ways to blend images in Photoshop. Each of them has advantages and disadvantages. Ultimately, you will need to decide what works best for you and gets you the results that you desire. The best starting place, is to practice, try different techniques and methods, ensuring you understand what is happening. Through understanding, you can tackle just about any problem that you encounter.
Image Blending Tutorials
Find below many hours of free tutorials on blending images in Photoshop. Regardless of the techniques you prefer, you’ll find tutorials covering your area of interest. In our 2 image blending series, we cover multiple methods to achieve the same results. Some of the topics you’ll find covered are:
- Blending 2, 3 and more images.
- Many techniques from automated, gradient filter and luminosity blends.
- Replacing skies, with completely different skies.
- Stitching and blending panoramas.
- and much more…
Section Guide
A complicated blend, with two completely different exposure and coloured images. We use advanced techniques to create a perfect blend, and deal with strong halos around the trees.
In this tutorial I cover two examples of blending 3 exposures. The first deals with an image with bright highlights, the second a set of images with dark shadows.
By combining different methods of mask creation in ADP LumiFlow, we’re able to create a specialized mask. We show you how to combine mask creation methods, creating a perfect mask.
In this instalment of the image blending series, I focus on using graduated filters in Photoshop. This is a very power method, that replaces the need to use graduated filters in the field.

There are many way to use luminosity selections when we’re blending image in Photoshop. In this tutorial, I use zone system masks to help make selections allowing more control over blending.
There are 3 methods of automated exposure blending built into ADP LumiFlow. It’s a very quick tool for blending up to 7 images and can often give great results, speeding up your workflow significantly.
Image blending is one of the most popular techniques used by landscape photographers to deal with exposure. This tutorials series shows many of the blending methods they use.
Taking cityscapes in the blue hour can create some very dramatic images. The lights of the city can cause issues with exposure. This tutorial show how to deal with the very bright lights of the city.
Exposure blending is one of the most popular uses for luminosity masking. The blending process can be quite complicated when you’re working with bracketed images, and even harder with panoramas.
In this episode we complete a 3 image photo blend. Peter presented an issue, having difficulty with the blending process, with 3 exposures, 2 stops apart.
The complexity in replacing the sky in an image can differ greatly depending on a few things. In this case Dennis asked us if we could help with a challenge.

In this episode Jo was asking to see how to complete a six image photo blend. In this example I use the Automated blending tools in ADP LumiFlow.
By taking two exposures in the field you can replace graduated filters. Create perfectly blended image in post, in a simple step, give you much better results.
The blending of multiple exposures with luminosity masks can be easy. Using the techniques that I show in this video tutorial, you can blend 3 images or more.
Through blending of multiple exposures, we create beautiful high dynamic range images naturally. This tutorials works with the difficult tasks of working with extremely fine details in tree leaves and branches.