Complete Guide To Luminosity Masks
Get a deeper understanding of what luminosity masks are, and how they are created. Learn how to create different types of masks and their uses in your workflow.
Take your post processing to another level.
Light and Photography
Photographers have been manipulating light in all its forms since the first photographs were taken. Whether it was in the field with natural or introduced light, or the dark room with chemicals, and adding or removing light during developing. In the digital age our ability to control light has been taken to a whole new level. With editing programs such as Lightroom and Photoshop we have unprecedented control. Learning from the masters and applying it to modern day technology, we now have luminosity masks. Whether it be dodging and burning, gradient adjustments, or zone system manipulation it has never been easier.
Luminosity Masks are a method of making selections in your image based on the brightness values of the pixels. They are used as a tool by photographers to edit their images with incredible control. The term Luminosity Masks, although a good description, can strike fear into many. Being new to Photoshop they can appear overwhelming, putting you off using them in your workflow. In this article, we’ll remove the complication created by the term, and endeavour to have them much more easily understood. We’re all striving to improve our post processing, and they are an important tool that will help us get there. Throughout the sections in this post, we explain them in detail, and how they can be created.
Section Guide
ADP LumiFlow Plugin For Photoshop

Luminosity Masks Explained
Luminosity Masks are unlike any other method of creating masks in Photoshop. While all the selection tools in Photoshop create hard line selections, they have smooth graduated transitions. As a result of smooth transitions, adjustments can be made to your images without the harsh adjustment lines. Giving you complete tonal control. You also have incredible control over the tonal ranges that can be selected. Virtually allowing you to make any selection in your image. With the powerful control to make adjustments, hard line selections are made easily, and more accurately than most other tools.
What Are Layer Masks?
Before we delve too deep into the masks, we first need to understand what a layer mask is. If you have a clear understanding of layer masks in Photoshop, you may want to skip ahead.
White Mask
When the layer mask is white, or where it is white, you will see the effects of that layer. Meaning if that layer is an image, you will see the parts of the image where it is white. If that layer is an adjustment layer, you will see the adjustments made, where the layer mask is white.
Black Mask
When the layer mask is black, or where it is black, you will not see the effects of that layer. Meaning if that layer is an image, you will not see the parts of the image where it is black. If that layer is an adjustment layer, you will not see the adjustments made, where the layer mask is black.
Shades of Grey
When the mask is a shade of grey, not black or white, it will partially show the adjustment or image layer. The closer it is to black the less you see, the closer it is to white the more you see.

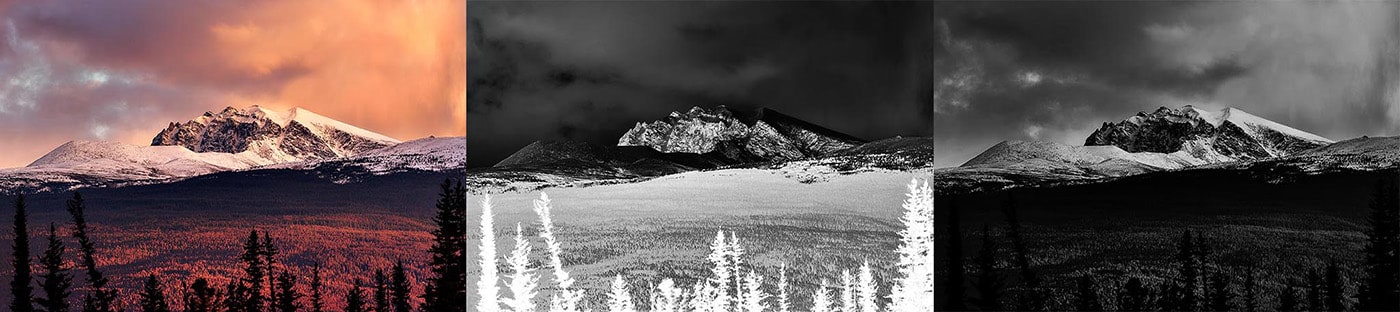
In the example above, a curves adjustment layer was used, and the image was darkened significantly. If you hover over the image, you will see how the layer mask was painted. On the left the entire effect of the darkening is seen, because the layer mask is white. In the middle, the effect is only partially seen, because it’s painted grey. On the right, none of the effect is seen, because the mask is painted black.
Making Selections in Photoshop
In Photoshop, there are many ways of making selections. These selections allow us to have greater control over the way we edit our images. From fine adjustments to image composites, the sky is the limit on how we can use selections. Each of the selection tools has their own unique strength and weakness. Skipping over “dumb” tools such as marquee tools, the more powerful selection tools in Photoshop are:
Quick Selection: This tool is looking for edges of contrast in your image, allowing you to make reasonably good selections of objects with strong edges.
Magic Wand: The magic wand tool takes Quick Selection to another level. This tool allows you to control the sensitivity of the selection brush.
Color Range: Colour range is a great tool for making selections purely based on specific colours in the image. You also have the ability to set the tolerance, allowing broader or more specific selections.
Select and Mask: The select and mask tool is a powerful method of allowing you to clean up your selections and refine their edges.
All the selection tools mentioned above are important to understand, as they are useful in your workflow in certain circumstances. Even though a few of them are smart, on many occasions you will still struggle to get the selection you desire. The other pitfall is that they don’t offer very smooth transitions, even if you choose to use the feathering options. This is where luminosity masks can be so powerful.
What Are Luminosity Masks?
They are masks developed based on the brightness values, or luminance of the pixels in your image. Each of those pixels is converted to a grey scale value, dependent on the type of mask you have chosen. With the masks being created directly from the brightness values of the pixels in your images, the transition between tones is feathered. This feathering of the transitions, allows you to make smooth adjustments to specific tonal ranges without the downside of hard-line selections. They can also be manipulated through the use of colours, adjustments and dodging and burning to refine your selections. These tools allow you to create luminosity masks to suit just about any purpose.
Types of Luminosity Masks?
The most commonly used masks are in the light or dark tonal ranges. These masks allow you to create virtually any selection within the lights or dark areas of your image. From there the development of masks become much more complex. With some effort, you can create luminosity masks in the midtones and throughout all the tonal zones.
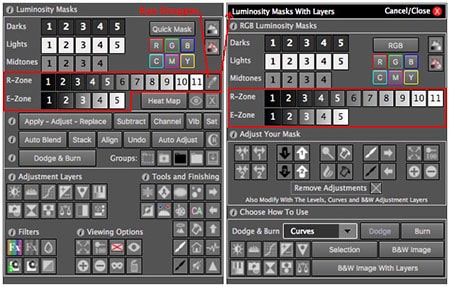
There are a few different methods to create luminosity masks. In the “How To Create Masks” section below we run through a few methods available to make masks with the ADP LumiFlow Plugin. These methods include, Luminosity with Layers, and Quick Masks (calculations), both of which have advantages and disadvantages.
We also have zone system masks built into the panel. These masks allow you to select areas in your images based on a 5, 11 and 19 zone system. The most powerful of the selection tools is our Heat Mapping. This overlays the zone system in a visual colour overlay, and allows you to make multiple zone selections at a time.

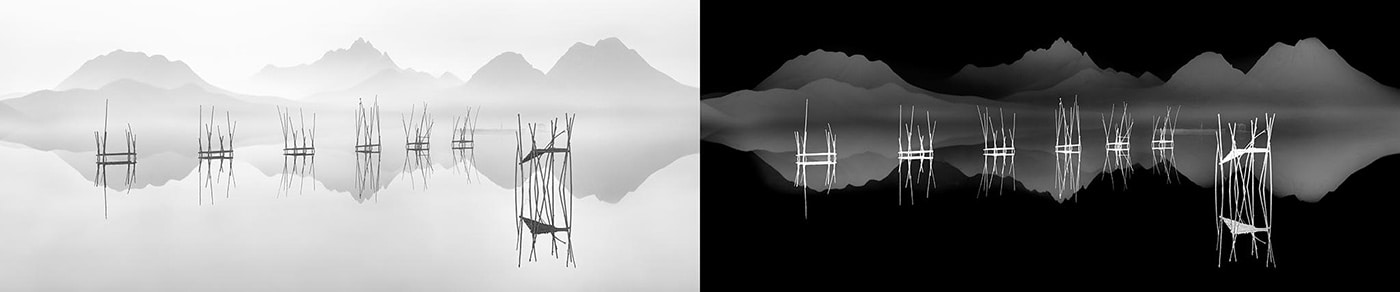
Hovering over the image above reveals a Lights 1 Luminosity Mask. This is basically a black and white version of the image, except it’s the actual layer mask. You can see the smooth transitions throughout.
How Can You Use Luminosity Masks?
They are a powerful tool for making adjustments in all types of photography. If your image has luminance, which all images do, they can be used to make selections and control light. The uses in your workflow are only limited by your imagination. Some of the most common methods include:
Luminance Adjustments: Creating masks to control areas that you want lightened or darkened, through adjustment layers.
Contrast Adjustments: Creating greater separation between tones, helping those subject to stand out in the image.
Colour Adjustments: Using luminosity masks to control the areas where colour is added or enhanced, such as warming the highlights only in an image.
Dodging and Burning: Control the areas affected while dodging and burning.
Accurate Hard Line Selections: Defying the smooth transitions, you can use them to make hard line selections for adjustments or compositing.
Digital Blending: Blending multiple exposures to create a more balanced final exposure.
These are only a few of the more popular examples for the uses of luminosity masks in your workflow. Don’t limit their use to only what you see in videos or tutorials, experiment and find new amazing ways to use these powerful tools. See our Luminosity Video Workshop to learn how to use them in your workflow.
Methods of Mask Creation
At ADP LumiFlow we realise that everyone has different preferences when it comes to creating luminosity masks. We have incorporated many methods of mask creation within the panel, so you have options and can reap the benefits of all their strengths. In addition to the methods described above you can also create them with:
Mask Creation Tools in ADP LumiFlow
Luminosity with Layers: This method of mask creation uses layers to create masks. The greatest benefit of using layers over other methods, is the ability to modify masks using colour. See our tutorials on How To Create Luminosity Masks below for more details on how these tools are used.
Quick Masks (Calculations): Creating masks with calculations using Quick Masks, is a very powerful method of mask creation. The main benefit of this method over using layers is the power of dodging and burning the mask. See our tutorials on How To Create Luminosity Masks below for details on how these tools are used.
Heat Mapping: This is a visual zone system selection tool, and one of the most powerful in its simplicity. This is fully described in: Create Zone System Masks.
Restricted and Expanded Zones: These are available in Luminosity With Layers and Quick Masks. There are options for 5, 11, and 19 zone systems. You can also make selections directly from your images.
Subtraction Masks: You can create your own custom selections by subtracting masks from each other. A powerful method for removing unwanted tonal ranges.
Apply, Adjust, Replace: This is a powerful tool that allows you to apply a luminosity mask to an existing layer that does not have one. You can adjust a mask on a layer that already has one, or replace it all together. Working between the mask and image view you can see your adjustments in real time.
Creating Luminosity Masks in Photoshop and ADP LumiFlow
Traditionally luminosity masks were created by making selections through your channels. The process for creating the masks can be cumbersome so actions were made to make the process easier. As the uses and power of the masks became more understood, the complexity in the masks that could be created expanded. At the same time a greater understanding of the bit depth of masks started to be discussed (8-bit vs 16-bit). As a result, new methods, other than channels, to create masks started to be explored.
Today there are two popular methods of creating luminosity masks on the market. Masks are created through calculations, and directly from the image with layers, both of which are 16-bit. They each have their advantages and disadvantages, and both methods are built into ADP LumiFlow tools, so you don’t have to choose. In this article, we will discuss how to create them using ADP LumiFlow tools and why you’d choose one method over another.
Section Guide
Create Luminosity Masks Using Channels (Legacy Method for Mask Creation)
Channel masks are a legacy method of mask creation, and are still an effective way of creating luminosity masks. These masks are available in ADP LumiFlow as a legacy tool, but are not the method used to create luminosity masks in our plugin. You can also watch a short video below that shows how all of this is done.
Create Lights Masks
Step 1: Press “Cmd” and left click on the RGB Channel, marching ants will appear on the image
Step 2: Click the “Save Selection” button at the bottom of the Channels Palette, and rename the layer to Lights 1
To then create a lights 2 through 6 follow these steps:
1: Press “Cmd” and left click on the Lights 1 Channel.
2: Press “Cmd + Opt + Shift” and left click on the Lights 1 Channel.
3: Click the “Save Selection” button at the bottom of the Channels Palette, and rename the layer to Lights 2
Repeat this process until you have created all of the luminosity masks you desire.
Create Darks Masks
1: Press “Cmd” and left click on the RGB Channel, marching ants will appear on the image.
2: Press “Shift + Cmd + I” to invert your selection, or go to Select > Inverse
3: Click the “Save Selection button at the bottom of the Channels Palette, and rename the layer to Darks 1
To then create Darks 2 through 6, follow the same steps as you do in the Lights, except using the Darks masks.
Creating Midtone Masks
1: Create the lights and the darks luminosity masks.
2: Press “Cmd + A”, this will select your entire image.
3: Click “Cmd + Opt + Shift” and click on Lights 1 , this will remove the Lights 1 mask from your selection.
4: Press “Cmd + Opt + Shift” and click on Darks 1, this will remove the Darks 1 mask from your selection.
5: Click the “Save Selection” Button at the bottom of the Channels Palette, and rename the layer to Midtones 1
Repeat this process using Light and Darks 2 through 6 to create all of the Midtone masks.
Quick Tips
Once you have created a Lights 1 or Darks 1 mask, you can restrict that selection by applying a levels adjustment to the mask. Select the layer that you want to adjust without loading it as a selection, then press “Cmd + L”. This will bring up a levels adjustment. You can now slide the middle slider on the levels adjustment to create an infinite number of masks.
Video: Create Luminosity Masks In Channels
Create Luminosity Masks With Layers in ADP LumiFlow
Creating Luminosity with Layers is one of the more powerful methods of mask creation. This method of mask creation uses layers to create a luminosity selection. As a result, there is a major advantage, we can now use colours within the image to manipulate the mask. In this section, we will describe how to create luminosity masks with layers using ADP LumiFlow.
In this section, we are going to cover the Darks, Lights, Midtones and Colour Channels. We cover the Restricted, Expanded and Heat Map in a separate article, that can be found in the “Create Zone System Masks Section”.
From the main ADP LuminFlow window, you can make any luminosity selection. The mask and adjustment layers will be created, and the Luminosity With Layers Plugin will open. Once you are in this plugin you can cycle through all of the available masks, very quickly. Included in your options are 5 Darks, 5 Lights, 4 Midtones, 11 Restricted Zone, and 5 Expanded Zone masks. All of these masks can be final or just a starting point for further adjustment.
Another set of buttons you’re going to find in this section are the colour masks. What these buttons do is restrict your selection to these colour channels. This means you can more accurately target specific areas in your image by eliminating colour channels. These are particularly useful if you’re finding it difficult to find the mask that targets your desired area.
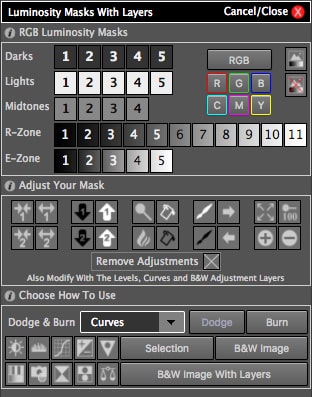
Creating Luminosity Masks Using Layers
Select Your Mask > Adjust Your Mask > Choose How To Use
Our Luminosity Masks plugins have been created with a top down approach. At the top, you are choosing your starting point, or the mask that you want to work with. In the next section, you are modifying the mask. In the last section, you’re choosing how you want to use the mask.
At any point, if you decide you no longer want to create a luminosity mask, or you want to use another method, press the close button at the top right of the panel and you’ll be taken back to the main panel.
Video: Luminosity With Layers Introduction
Create Luminosity Masks With Quick Masks (Calculations) in ADP LumiFlow
Using calculations is another popular method to create luminosity masks in Photoshop. Unlike the Luminosity With Layers Plugin, you will not get a set of layers to work with. These 16-bit masks are stored in the background, but are adjusted using all the adjustment options available.
The functionality in Quick Masks is almost identical to that with layers with a couple of exceptions. The differences in the functionality of Quick Masks compared to Luminosity with Layers are detailed below. All of the other functions are the same, and to see those details, you can read them above in the Luminosity With Layers section.
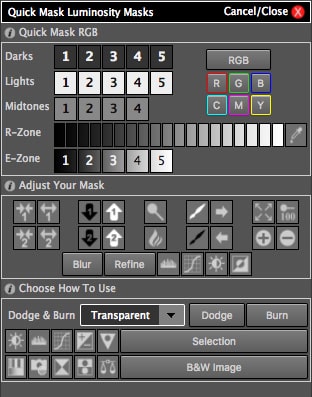
Creating Luminosity Masks Using Quick Masks
When you click on the Quick Mask button from the main panel the Quick Masks Plugin will open. This panel opens initially with a Lights 1 selection already made. All of your selections and adjustments of your mask are now going to be done from within the panel itself, there are no layers created with this method.
The key differences with this panel are:
- The Restricted zones have 19 zones instead of 11. See the Create Zone System Luminosity Masks section for more details.
- When you choose the colour channels, they will automatically revert to a Lights 1 selection of each channel. Unlike with layers, you will always be reverted back to Lights 1. This means that if you want to use colour channels, you must make your colour channel selection before modifying your mask.
Video: Quick Mask Introduction
Understanding Zone Systems with Luminosity Masks
The zone system has been around for a long time, and was coined back in the 1930’s by Ansel Adams and Fred Archer It was a method of photography developed to ensure correct exposure. It is basically a system of controlling exposure through tonal zones in order to achieve a correct and balanced exposure. Zone system masks have been developed so that you can visualise, select and manipulate those tones to your advantage.
In the ADP LumiFlow Plugins we provide several methods of working with the zone system. We have the traditional 11-zones built into Luminosity With Layers and our Heat Map tools. We also have a reduced 5-zones in both Luminosity with Layers and our Quick Masks. There is also a 19-zones built into Quick Masks allowing you to make finer selections and adjustments. In this article, we will describe how to make luminosity mask selections using all of the Zone System tools built into our panel.
Section Guide
Zone System Luminosity Masks Explained
Using zones in the processing of images is a very powerful tool to control exposure and contrast within specific zones. This allows you to direct light much more accurately then using standard mask and painting techniques. The 3 different zone systems give you the greatest flexibility, allowing you to make fine adjustments to much larger tonal adjustments.
When someone is viewing our images, there are three things that direct the way a viewer sees the image:
- Contrast: The areas of higher contrast (lights against darks).
- Saturation: Areas of high saturation, and in particular warmer colours.
- Sharpness: The parts of an image that are in focus and sharpness.
What does this mean in relation to using a zone system?
The zones allow us to control contrast and light, very accurately, helping us to emphasize the areas of importance. We can shift specific tones in the image to either emphasise, de-emphasise or add contrast, helping direct the viewer to the important parts of the image.
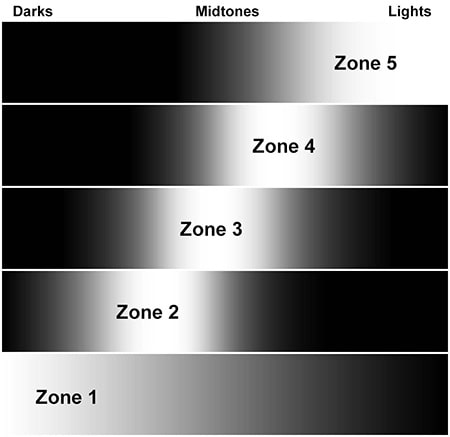
You can see from the examples to the right, they have feathered transitions. This allows you to make adjustments within specific tonal ranges and have smooth transitions with other tones. Larger tonal ranges give you greater feathering and allow you to make larger, smooth adjustments. The narrower your selection, such as the selections in the 19 zones, mean your adjustments should also be more subtle.
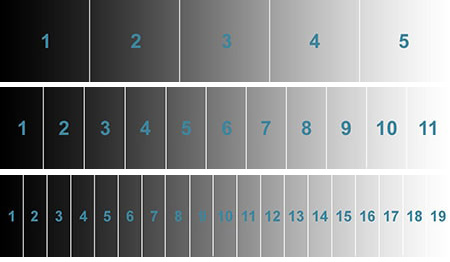
There are 3 different zone systems available in the ADP LumiFlow Luminosity Masks Plugin, a 5-Zone, 11-Zone and 19-Zones.
5 Zones
The 5 Zone System is available in both Luminosity Masks With Layers and Quick Masks. The selections using 5 zones are much broader, selecting a greater tonal range then the other two systems available. These are valuable when you’re looking to make larger adjustments in your image, such as shifting a larger tonal range in an image to a high or low key.
11 Zones
The 11 Zone System is available in Luminosity Masks With Layers as well as the very powerful visual Heat Map tool. The main difference being the Heat Map is visual and allows you to select multiple zones at a time. This system is the most commonly used as each zone is both broad and restrictive enough to give you fine control without being overly limiting.
19 Zones
The 19 Zone System is only available from the Quick Mask panel. Using this system, allows you to select a very narrow tonal range within your image, and is best for fine tuning contrast or brightness. This is a great tool for subtle adjustments in your images.
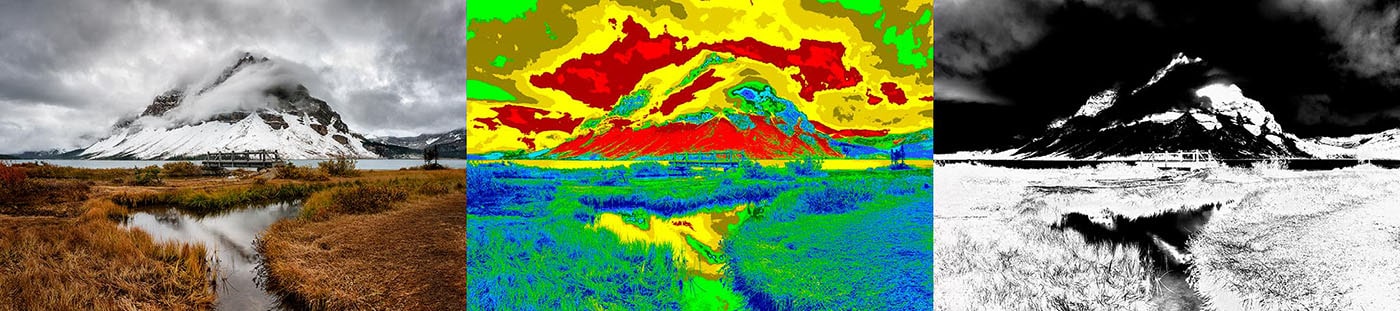
Using The Heat Map
The Heat Map tool uses an 11 zone system and the calculations method of mask creation. The visual interface allows you the user a clearer understanding of where the tones in your image are. Each of the tonal zones is represented by a specific colour and these colour are replicated in the selection area of the panel. This makes it extremely easy to pick the zones you want to work within.
An additional benefit of seeing the visual representation of the zones, is that you see where the eye is likely to be led. This allows you the ability to manipulate the image to help lead the eye throughout the image. This panel works in the same way the other luminosity mask panels work, with a top down approach. You make your selection in the top section, adjust it in the middle, and choose how to use it at the bottom.
An example of a heat map can be seen in the middle at the top of this page, or you can watch how they work the video.
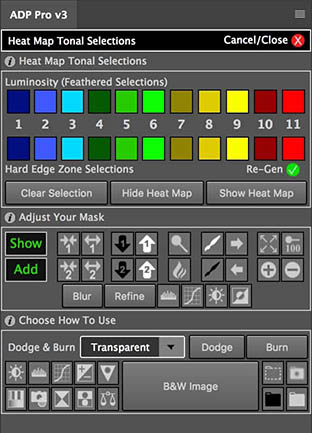
Heat Map Tonal Selections
Making tonal zone selections has never been easier. The colours of the heat map are replicated in the selection section of the panel. You have two options for selection:
Luminosity: The top row of colours are luminosity mask selections, meaning they are feathered selections.
Hard Edge: The second row of colours are hard edge selections, and they will perfectly match what is seen on the heat map.
Unlike the other zone system tools built into the panel, you are not limited to a single selection with the heat map. You can make multiple selections, selecting as many zones as you desire. Each time you select a new zone it will be added to your existing selection, allowing you to make virtually any selection you want.
Viewing and Adjusting Your Masks
If you want to view your selection as a mask, you just need to press the green “Show” button in the Adjust your mask section. If you want to add more to your selection, press the “Add” button. This will bring your heat map and selection up again for you to add to.
When you make adjustments to your image, the heat map also gets adjusted, and will represent the changes in your image. The tools that make the selection don’t know that the image has changed though. As a result, the “Re-Gen” button has been added. When you make changes to your image, use the “Re-gen” button to regenerate your selection tools.
Video: Using The Heat Map Zone System
Using the Restricted and Expanded Zone System Luminosity Masks
The zone system tools built into the Luminosity with Layers and Quick Masks work the same way. The key differences between them are the number of available zones. In the Luminosity With Layers panel there are 11 and 5 zone systems. In the quick mask panel, there are a 19 and 5 zone system.
11 and 19 Zone Systems (Restricted Zones)
With the 11 and 19 zones, you have the ability to make a selection directly from the image. One of things about using tonal zones, is knowing which zone to choose. By using the eye dropper tool that is available to you, you can make a selection directly from the image. When you make a selection and press OK on the colour palette, the panel will select the appropriate mask. Note the panel is analysing the area to make its selection. It may not always be 100% accurate. If the selection is incorrect, chances are it will be by 1 zone. If this happens you simply just need to select one of the zones on either side of the one selected.
5 Zone Systems (Expanded Zones)
The expanded 5 zones, is a much broader selection. These zones allow you to make much larger adjustments in your images, with a large feathered zone. Typically, these would be used for broader contrast adjustment or to make large shifts in exposure.
Note: You can also cycle through all of the zones, just like you can with any of the other luminosity mask options within the panel.
Video: Tonal Zone Selections
Using Luminosity Masks
Combining the power and control of Photoshop, with the fine selections in luminosity masks and you have limitless possibility. With Photoshop, we the ability to modify just about any aspect of our images. Including colour, contrast, perspectives and sizes, tones, clone and heal, and much more. It’s rare that we’re making global adjustments to our images in Photoshop. This would completely defeat the purpose of using it to begin with. This means that we’re looking for control.
Through the selections that we make and masks we create, we can control the areas affected in our images. Whether that’s how we paint or apply layer masks, or how we use those selections for composites, painting and more. Not everything we do requires us to have accurate selections, but often we’re frustrated not having enough control.
This is where luminosity masks offer us the control that we otherwise wouldn’t have. They allow us to make very accurate selections, allowing us greater creative freedom. Our limitations and frustrations are reduced, and our ideas can more easily be achieved. There are no limits to how they can be applied and used. Below are just a few examples of their power in photo editing.
Section Guide
Using Luminosity Masks with Adjustment Layers
This is one of the more popular methods of using them. But, what is less well known, is how incredible they are with different types of adjustment layers. The luminance and contrast adjustment layers are the ones people mostly associate with them. But, they can be used with just about any type of adjustment layer.
Luminance Adjustment Layers: (Curves, Levels, B&C, Exposure, etc…)
When you’re looking to bring details out in shadows, or darken off highlights in an image, accurate control can be valuable. You may have dark interiors in building, or shadows around eyes and faces, a loss of detail in landscapes, etc… These aren’t uncommon scenarios, but can be troublesome to repair.
Using the luminance of those areas we can make a specialised mask to use on the adjustment layers. This allows us to restrict the exposure or luminance adjustment to only those brightness values. With the smooth transitions in the masks ensuring that nothing else around them is adversely affected.
Contrast Adjustment Layers: (Curves, Levels, Brightness & Contrast, etc…)
When you hear the term contrast, you’re typically thinking of an S-Curve. These often mistakenly applied to an image through its midtones, without consideration for what you want to affect. Instead when making contrast adjustments we should be applying the adjustment in the tonal range we want the contrast. This could be in the shadows, highlights, midtones or something in between. In Photoshop, we have the ability to put the points anywhere we want on the curve, giving us some control. But, other tones are still affected, even if we mask and paint them back in. The same methodology applies to Levels adjustment layers.
Using luminosity masks, we can apply a mask to the exact tones that we want contrast. By doing this we don’t have to worry at all about surrounding areas, applying adjustments with confidence. The added bonus is you will see where those tones lie on the contrast adjustments histogram, allowing more accurate control over your adjustment.
Using ADP LumiFlow you have the ability to select specific tonal ranges with ease. Using the 5, 11 or 19 zone systems built in to all the luminosity mask creation tools.
Colour Adjustment Layers (Hue & Saturation, Vibrance, Color Balance, Photo Filters, Selective Color, etc…)
Here’s where you break away from the well-known uses for luminosity masks, realising their full value in our workflow. Colour in an image is extremely difficult to manage well at the best of times. This is evident in the many images we see with funky colouring and over saturation. Almost everything we do in Photoshop affects colour, and can quickly get away from us if we don’t stay on top of it.
Many of the colour adjustment tools in Photoshop give us the ability to work with specific colour. This is great, but it still has limitations, as it will affect that colour throughout the image. By combining that adjustment layer with a luminosity mask, you’ll have ultimate control over those colours. You can even use those colours to your advantage when creating your mask with the Luminosity With Layers plugin.
The colour balance adjustment layer uses luminosity internally, in the background. Allowing you to adjust colour in specific tonal ranges. It’s a fantastic tool for modifying colour, but sometimes its reach is too far. You don’t have the ability to modify its reach. You can use a luminosity mask here to further control the area, for ultimate control with this fantastic tool.
Curves and Levels adjustment layers are also brilliant tools for colour adjustment. By utilising the R, G and B channels in them, you have amazing control over colour. Then apply a luminosity selection, the sky is the limit.
Painting with Luminosity Mask Selections
Painting is one of the most common ways that we use luminosity in our workflow, but we might not realise it. With this method, we are painting the effects into the image using a brush or similar. It allows us to control the strength of effects, and apply it to only just the areas we want affected. We can also layer through brush strokes, building up the changes gradually. As with anything in Photoshop there are no limits to how they can be applied with this method. Below are the most common ways painting with selections are used.
Adjustment Layers
Luminosity masks are a great method of restricting the tonal ranges that we want to work within. But, that tonal range can exist in places throughout an image that we don’t want affected. In these cases, simply applying a mask to an adjustment layer won’t always work, unless we’ve created the absolute perfect mask.
Scenario 1
Do a global adjustment with a white layer mask on the adjustment layer. Then invert the layer mask to black to hide the full effect of the adjustment. Then use a luminosity mask selection (with the marching ants), and use a white brush to paint the adjustment back into the areas you want. Using a lower opacity brush you can gently paint in the adjustments, with the selection restricting where it’s applied.
Scenario 2
Use your selection like you normally would on an adjustment layer. Complete the adjustment so it is affecting the area you want it to effect. While you’re doing this, don’t pay any attention at all to how it’s effecting other areas of the image. Now, using the Mask the Mask options in ADP LumiFlow, put the adjustment layer inside a black group. This will completely hide the adjustment on the entire image. Now, using a white brush start to paint in the areas you want the adjustment. You can also work with a white masked group as well. With this method, you use a black brush and paint away the areas you don’t want effected.
Dodging and Burning
Dodging and burning is one of the most effective tools that we have available to paint with light. Allowing us to work within specific tonal ranges separately. We build up the strength in our highlights and deepness of our shadows through painting. There are many ways that dodging and burning can be done in Photoshop. Built into ADP LumiFlow are 3 methods, each having its advantages. Coupled with this is using luminosity masks to control the areas affected.
Photoshop uses a similar method in their dodging and burning tool built in. Built into Photoshop you have the ability to work in the highlights, midtones, or shadows. Although this gives us some flexibility, rarely meets your requirements. Another method is using curves layers, one for dodging and one for burning. This is also an effective method, but without luminosity selections, you need precise painting.
With the three options built into ADP LumiFlow you will paint in your dodging and burning. But, the big difference will be the luminance control you have. This will ensure that only the areas you want to work in are effected. This will give you an amazing ability to manipulate light and significantly speed up your workflow. These tools are built into all the luminosity creation tools, as well as a dedicated dodging and burning plugin.
Method 1: Curves
The curves method of dodging and burning is a common method used by many photographers, and is very popular in portrait retouching. Its standard application is creating a curves adjustment layer for the highlights and one for the shadows. Then lightening the curve for the highlight, and darkening for the shadows. Turning the mask on the layers to black, you paint with a low opacity white brush, to reveal the lightening or darkening. Most often you also change the blending mode of the layers to luminosity, so colour is not affected.
The method described above is the basis for this method that built into ADP LumiFlow. The exception being that you are using luminosity masks to determine exactly what tonal range you want affected. This gives you amazing control, and a massive advantage. You no longer need to fuss around with brush sizes and fine strokes, the mask controls the tonal values affected. So, you’ll never bleed into other areas again.
Method 2: Transparent
There are a few advantages to dodging and burning on a transparent layer. The first being that you can both dodge and burn on the same layer. The second advantage is that you can dodge and burn with colour. This allows you to use colour while lightening or darkening areas of your image, keeping the richness.
When you combine this method with luminosity masks you have incredible control over the richness and vibrancy of colour in your images. The masks are applied directly to the transparent pixel layer, so you dictate the tonal range affected. Select the colour of brush you want, and start painting with light and colour.
Using a brush lighter then middle grey or a lightness value of 50 and it will lighten when you paint. Use a brush darker then middle grey and it will darken when you paint. You also don’t need to use a colour brush, you can choose to paint with white or black brushes for standard dodging and burning.
Method 3: Middle Grey
Using a middle grey layer, is very similar to using a transparent layer. You can do both dodging and burning on the same layer. This method uses a layer that has been filled with a middle grey colour, and then a blending mode is used to create contrast. This allows anything darker then middle grey to darken and anything lighter to lighten your image. The benefits being that you are able to see much more easily where you have applied the lightening or darkening. Then using a middle grey brush, you can erase any areas may have worked in by mistake.
After making creating any luminosity masks, you have the option to create a Middle Grey dodging and burning layer. Making this selection, the mask will automatically be applied to your layer, and you’ll be ready to start painting.
Which Method Should You Use?
Often the methods are interchangeable. Below is a quick to help make the decision on which method to use.
Curves: This method is best used when you don’t want colour to be affected.
Transparent: Use this method if you want to paint with colour while dodging and burning.
Middle Grey: use the middle grey method if you want to easily see where you applied your adjustments.
Exposure Blending With Luminosity Masks
The blending of multiple exposures, is a technique that was made popular by landscape photographers. Although a very powerful method of control the overall dynamic range of travel, nature and environmental portraits (including wedding).
A popular method of blending exposures was using HDR (High Dynamic Range) software, such as Photomatix. Although this software did a good job of combing exposures, it had some serious flaws. They would combine all the detail from all the exposures, creating a hyper realistic image. Where shadows are no longer shadows, highlights are no longer highlights, and colours appear over processed. This created a challenge in making images look and feel realistic.
The alternative to using HDR software is manually blending the images. And when combined with luminosity masks, you have complete control. Now you can choose what parts of each image are blended, allowing you to be creative, rather than software. This, if done well, results in beautiful high dynamic range images with great depth, shadows and highlights.
There are several methods you can use to blend your images. Below are some brief descriptions on the most popular methods.
Gradient Filter Method
This method is a personal favourite. Not only is it simple in its application, it is very effective. This method is similar to using a graduated filter in the field. It’s not often with modern cameras that we require more than 2 exposures to capture the full dynamic range. So, you’ll find, unless your shooting into the sun, that you’ll rarely need more then 2 exposures.
Place the two exposures on their own layers in Photoshop. Put a white mask on the top layer. The using the gradient tool, with white and black as the colours, drag a gradient over the mask. This will hide part of the top exposure, showing the exposure below. The benefit of this over in the field is in three parts:
- Stop messing around in the field with graduated filters and their holders.
- Adjust the position of the filter easily, so it will always be perfectly positioned.
- Use luminosity masks to paint away the darkened areas.
The largest benefit, is we can now paint away the darkened areas. This is impossible in the field with a graduated filter.
You can blend additional exposures as well if required, by using the method described below.
Selective Area Blending
With selective area blending you are combining multiple exposures, by painting in the areas you want from your images. This method of blending will work with 2 images, to an infinite number of images. It is rare that you will require more than 5 images, even if you’re shooting directly into the sun.
There are no restrictions on how you can apply your blending, but below is the technique that we find most effective.
- Choose your base layer, or the layer you’re going to use to blend into. This is typically a middle exposure.
- Place a layer below it. This layer will be your highlight or shadow detail, whichever you prefer.
- Put a white layer mask on your base layer.
- Make a luminosity selection, and load it as a selection.
- With your loaded selection, paint on the white mask with a black brush to reveal the detail in the bottom layer.
For any additional images repeat the following steps for each additional image.
- Place the new image on top.
- Put a black mask on the layer to hide its contents.
- Make a luminosity mask selection, and load it as a selection.
- Then using a white brush on the black mask, paint in the areas you want to reveal.
Tip: Paint with a low opacity brush, bringing in just a little bit of the detail at a time. Repeat this until you are happy with the blend.
Automated Blending
Built into the ADP LumiFlow Panel are three methods of automated blending. These tools have been provided to speed workflows, and to assist those who are new to using luminosity masks. They allow you to blend up to 7 images using 3 different methods. These methods are:
Semi-Auto and Semi-Auto Reverse Blending
These methods will blend anywhere from 2 to 7 images very quickly. There are some user inputs as well. These user inputs allow you to control the amount used from each image in the blend. This gives you a much greater chance of getting the final result you desire. You can also easily undo any blend, to try another method, with the click of a button.
Blend If
The blend if tools in Photoshop work very similar, except there are no actual masks created. They work by manipulating how each layer interacts with the next layer. Although this method can be effective, it’s much less intuitive. No layer masks are actually created, making it difficult to understand what is happening on each layer. Having said that, this is fully automated, and can give good results. You can of course go in and modify the results after the blend is complete. By modifying the opacity of layers, or even changing the blend if settings you can get different results.
Luminosity Mask Video Tutorials For Photoshop
The uses for luminosity masking in your workflow is limitless, with our imagination being the only thing holding us back. You’ll find many of the most popular methods, to some more obscure but very useful methods of using luminosity masks. Our hope is to accelerate your learning and understanding of applying them to your workflow. We have luminosity tutorials for users of all skill levels. Included in the tutorials on this page are topics covering:
- Dodge & Burning
- Using Them With Adjustment Layers
- Colour Grading and Adjustments
- Creative Uses
Section Guide
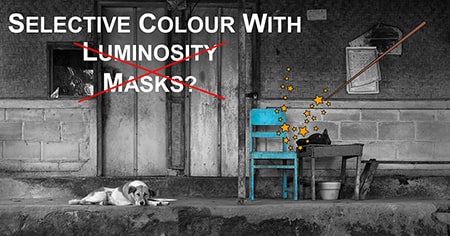
Creating selective colour images is fairly straightforward, the question is more around how you make the selection of the object you’re interested in. In this video I show several methods, giving you a few options.
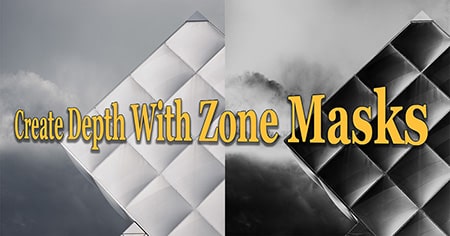
Chris shows us a fantastic technique using zone system luminosity masks to create depth in this image. Using the zone masks, he’s able to sculpt the light and shade in the building, creating a three dimensional look.
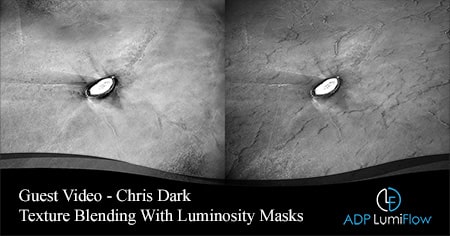
In this tutorial Chris shows us a creative technique he uses to combine textures from multiple images. By doing this he’s able to take the best of both images and reflect his creative vision.
Luminosity Masks are not often discussed in portrait photography. In this tutorial I show how you can use them with your portraits to make much more accurate adjustments and speed up your workflow
Combining colour adjustment layers with luminosity selections gives us the ultimate control over colour in our images. Discover several different colour grading techniques and how we’ve used them to give us amazing results.
In this tutorial we create luminosity mask selections using the visual heat map and subtraction masks. We combine those luminosity masks with the dodging and burning tools in the plugin for complete control.
One of the most effective ways to make our images jump of the page, is to inject contrast and colour into the midtones. Using midtone luminosity masks, we show you how to bring life to your images.
One of the most powerful ways of controlling light in Photoshop is to use luminosity selections to dodge and burn. In this tutorial, we use this powerful editing tool bring our hero items to life and make them a focus point.
The ways that we can edit the milky way or night sky are limitless. This allows us a great deal of creativity in our edits. In this Luminosity tutorial we selectively edit the Milky Way to bring it to life.
In Photoshop, there are many ways to achieve the same or similar outcomes. It’s important to know several methods to achieve something. This gives us the tools we need to dodge and burn with confidence.
Sometimes we’re faced with a cloning job that’s almost impossible. In this image, I wanted to remove some clouds along the edge of the tree line. Using luminosity we can remove the clouds easily.
Halos come in all shapes and sizes. We can get them from pushing edge contrast to far, such as over sharpening. Sometimes they just appear in your image from the brightness of subjects.
In this episode we complete a full image edit from Yosemite National Park. The challenge was to lead the viewers into the image. Using Luminosity masking and other tools we complete the full image edit.
In this episode, Bradley presented us with an image showing discolouration on a wall from a water stain. We show both a complex and simple solution to remove the stain from the wall.
Have you ever been frustrated not being able to make a good luminosity selection? This tutorial shows you how to combine two separate masks to create the perfect selection.

This tutorial shows you how to paint colour using luminosity selections to change colours in Photoshop, giving you complete control over the areas that are affected, and bring your vision to reality.
Completely changing the mood of your images is possible when working with the colours. There are many tools for colour adjustment in Photoshop. We show 3 of those colour adjustment tools.

Luminosity selections are commonly used because of the smooth transitions in their tones. What isn’t as well known is they can be used to make hard edge selections to cut our objects completely.