A large part of the creative process in photography is in the post processing of our images. This is where we turn our vision into reality. This can mean many things, from minor enhancements to bring the colour and contrast back into the image, to blending of multiple exposures to reflect the large dynamic range of a scene to creating an image using elements from several different images. The limits on how far you are willing to go in post processing is completely dependant on the individual and what limits you have set for yourself. What I mean by this is that there is no right or wrong in creating an image, only a right or wrong for you. I don’t like to set limits in my photography or post processing and consider the final creation the most important. Now having said all of that, it’s not to often that I create composite images. Like most I like the original image to have all the elements I need for a stunning image. But, this isn’t always the case and by combining multiple images I can create something that has much more impact and in some ways reflects something that I wish I could see. Now are these images or photography……. I’m not sure there is an easy answer to this, and I’m ok with that. For me it’s about being creative, having fun and putting a final product together that evokes emotion and has impact on me and others when they view the image. A few years ago my limits in post processing were much different then they are today. If you asked me 4 years ago my opinion on composite images and I would have told you that it was cheating….. but cheating who? Our personal preferences and limits continue to change constantly and what we deem unacceptable today may very well be acceptable to us tomorrow. As a result of this constant change in my photography and now that I spend a great deal of time looking to inspire others and teach photography, I no longer set any limits in photography or post processing. By setting limits we are stifling our potential creativity and that’s not good for photography as an art, we should be encouraging all creative aspects of photography, not only for ourselves but others as well. This doesn’t mean that I will push my beliefs or limits on others, it means that I won’t put constraints on anything anymore and I’m accepting of limits others have for themselves.
This is an image I created a couple of years ago while trying to find a 4th image to add to my portfolio of images being entered into the 2015 AIPP West Australian Professional Photographer of the Year Awards. This image has ended up being one of my highest awarded images to date, scoring a Gold Distinction and the highest awarded landscape image from 2015 WAAIPP awards and also scoring a Gold Award at the 2016 Australian Professional Photography Awards. So, how did the image come about? I was looking through my images, trying to find an image that would challenge and intrigue the judges. I wasn’t looking for a nice image, I had plenty of those, I needed to find something that they hadn’t seen before. As I was looking through my images from a scouting trip in Bali, Indonesia I came across the image you see here.
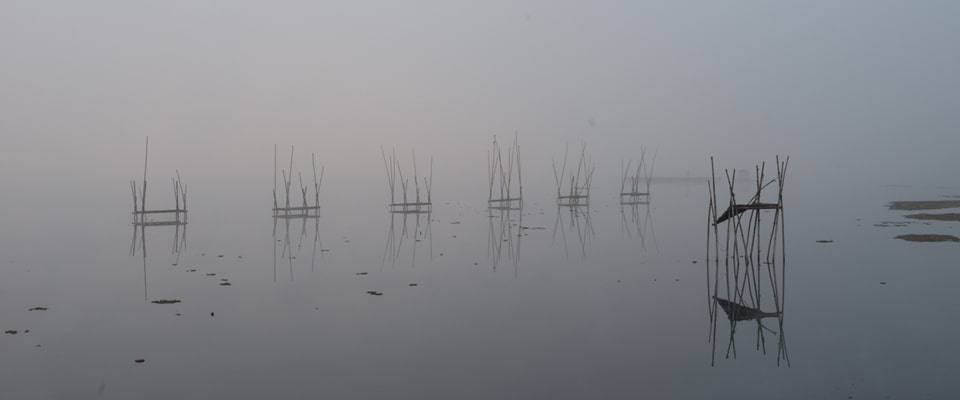
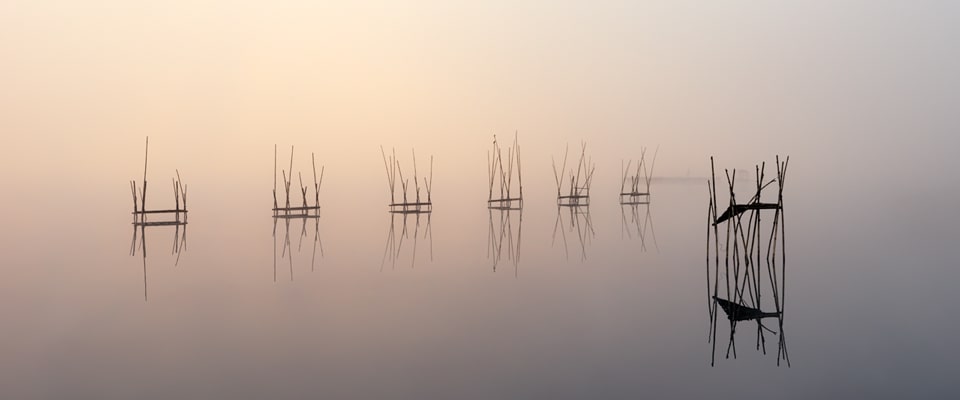
This is an image taken on an extremely foggy morning on a lake in the North of Bali. I hired a driver on this day that I hadn’t used before, and I did this to see if they could find me places that were off the beaten track. I told him that I wanted to visit a lake with structures in the water that no tourists would visit, and then left it up to him to see what he could come up with. We arrived at this lake, definitely not a tourist destination, about 30 minutes before sunrise. It was an extremely foggy morning and you could barely see more then a few feet in front of your face. I wandered around the shoreline looking for something of interest, but I couldn’t see a thing and I was beginning to think the driver led me on a bum steer.
The sun started to rise, I still couldn’t see anything and was about to call it off and head out to another location. Just as I was packing up a few sticks started to appear in the lake, they were sticks for the fisherman to tie their boats to, so I unpacked my gear and started to take some images. As it got lighter I started to see other things appearing out in the water, and saw an old dilapidated jetty and ran over there to photograph it. A few minutes later the fishing traps you see in this image appeared, so I moved out to the end of the jetty and started to photograph them. I was like a kid in a candy store as things started to appear that morning and ended up getting some great images, I’m glad I didn’t walk away. When I came across this image again, I began to process it as a potential image for the competition. I really liked the simplicity of the image, there were very few distractions in the shot that I couldn’t easily deal with. I wanted the image to be very clean and simple with a real feeling of isolation, so with this in mind I began to process the image.
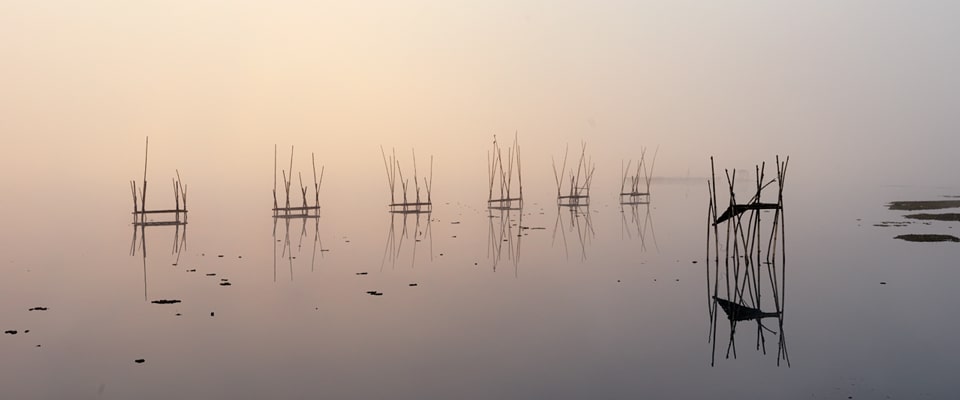
To start my post processing I played with the white balance in the image to warm it up a little, as my intention was initially to keep it a colour image. I wanted it to feel like some warm light was coming through the fog. I then added some simple contrast adjustments to give it a little bit of pop.
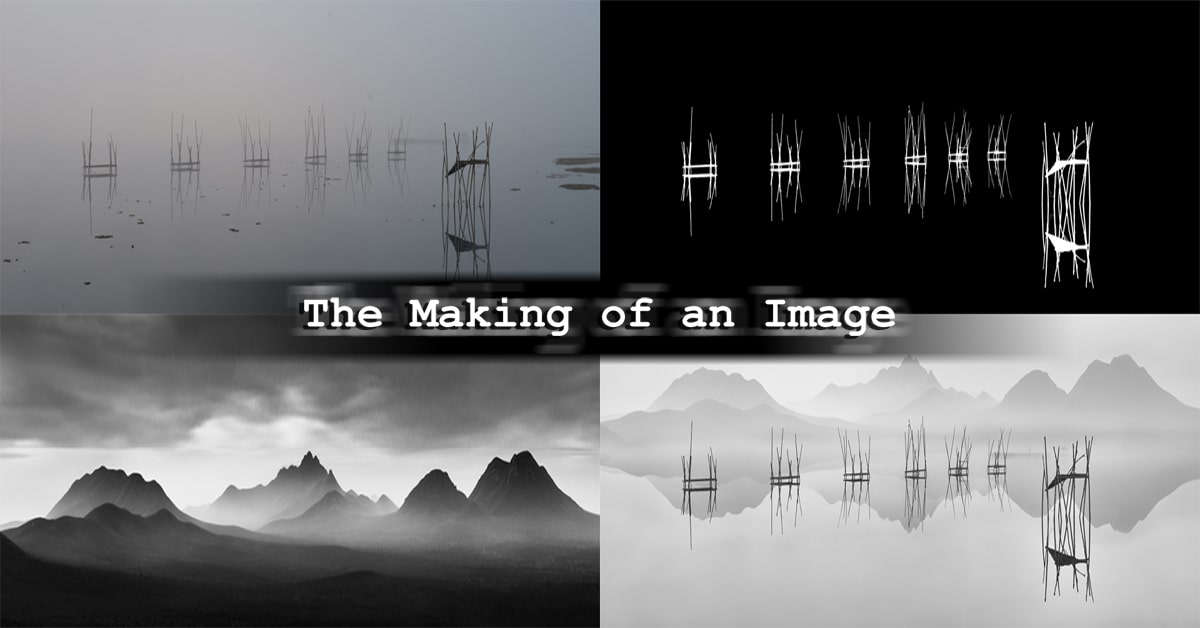
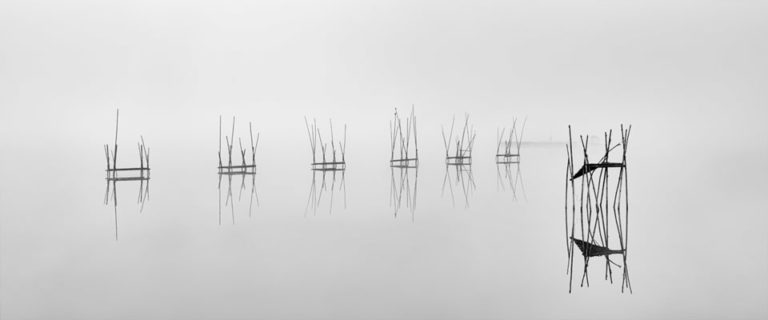
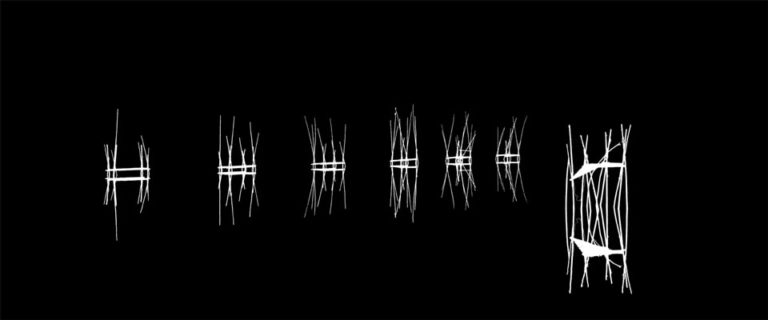
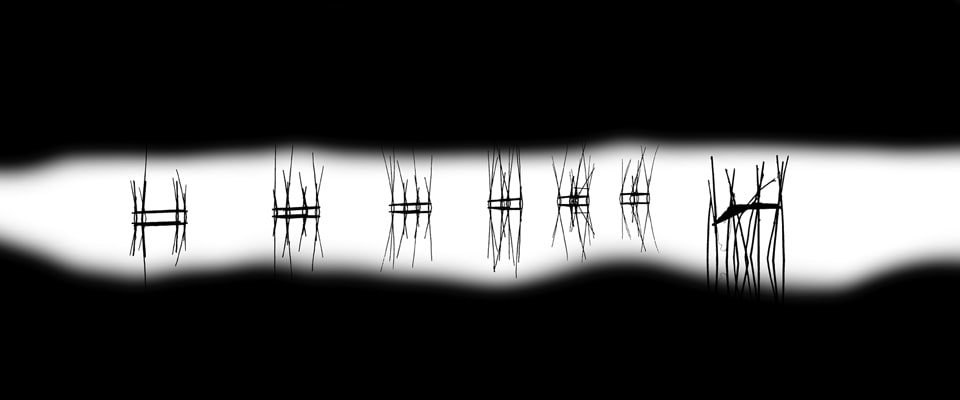
In my normal workflow I typically save removing distractions until near the end of my edit, but in this case I wanted to make sure that I could remove all of the distracting vegetation in the water cleanly before spending any more time on the image. At this stage I felt like the colour in the image didn’t work and that keeping it as a warm image was more of a distraction from the fishing traps then they were adding to the image. I converted the image to black and white to remove colour from the equation and then turned the image to high key, by taking all of the lighter tones and midtones in the sky and water and lightening them up. In order to do this effectively without affecting the fishing traps, I created a mask, using luminosity masks, that made a perfect selection of the fishing traps so they wouldn’t be affected by any adjustments I made in the sky and water. By simply inverting the mask shown here, I was able to modify the rest of the image without affecting the fishing traps themselves.
It was at this stage that I took a step back, and tried to decide whether this image was strong enough to do well in the awards. I sent the image to a trusted friend and amazing portrait, street and event photographer Johannes Reinhart for his opinion. Johannes said that it was a nice image, but it was missing something and made the suggestion to add some birds into the image. Well, I don’t have many images of birds, it’s not a subject I tend to photograph. I went off again trolling through my image library, not sure exactly what it was that I was looking for.
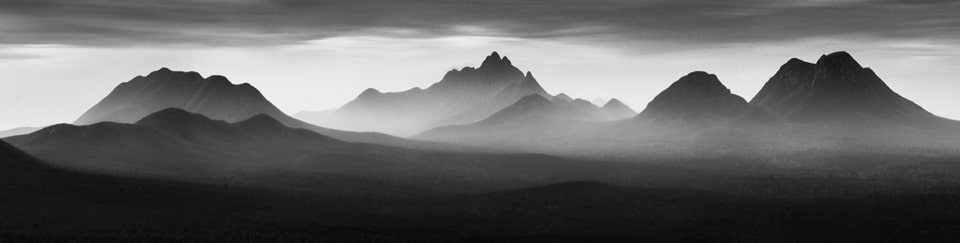
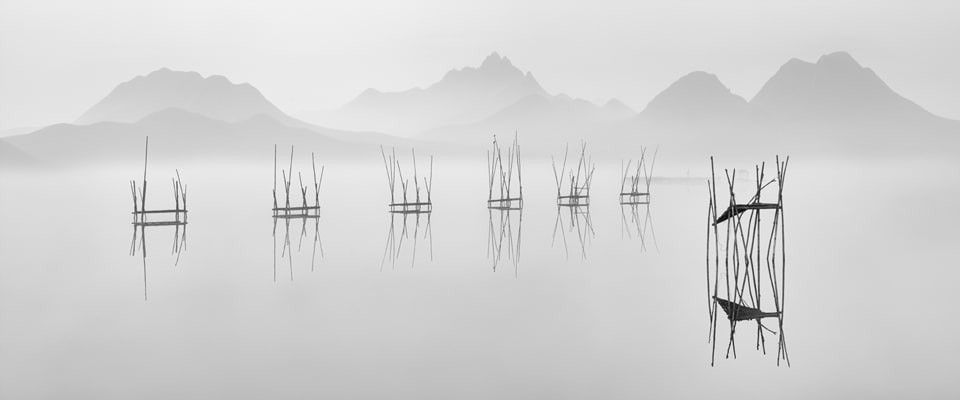
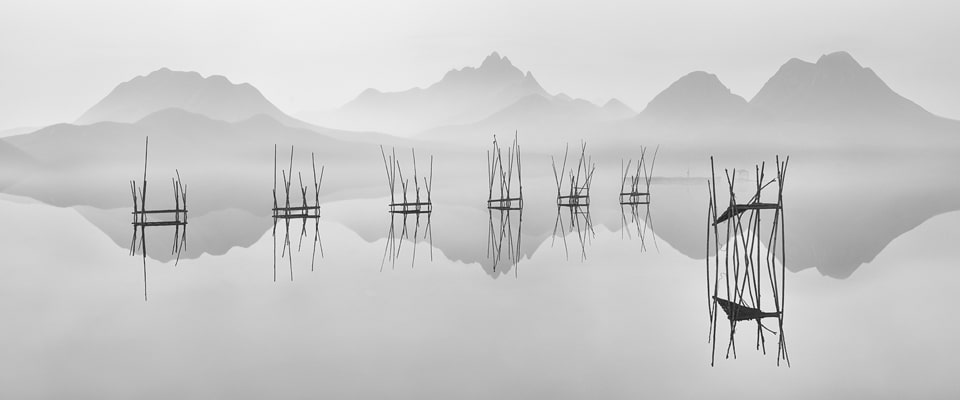
I then came across this image I had taken at the Stirling Ranges in the Great Southern Region of West Australia. As soon as I saw the image I knew that it was going to be perfect, I just didn’t know how perfect. With the really light sky above the mountain range I knew that the blending process should be pretty straight forward.
Taking the mountain image, I placed it on top of the fishing trap image and then significantly lowered the opacity of the layer to make it appear that the mountains were faded into the fog in the background. Then with a layer mask and a simple black, soft edge brush I painted out the foreground of the mountain range and a little in the sky, leaving me with the image you see here.
The next and final step in the editing was to reflect the mountains into the lake. To do this, all I simply did was make a duplicate copy of the mountain image and then used free transform on it to mirror the mountain range. Then I decreased the opacity on the reflection so that it was just a little bit darker then the actual mountains. There was one minor issue that I was left with and that was that the reflected image was sitting on top of the fishing traps. After masking the reflected image so it blended smoothly, I then loaded up the selection of the fishing traps that I had made earlier and removed the mountains in the reflection where the fishing traps were.
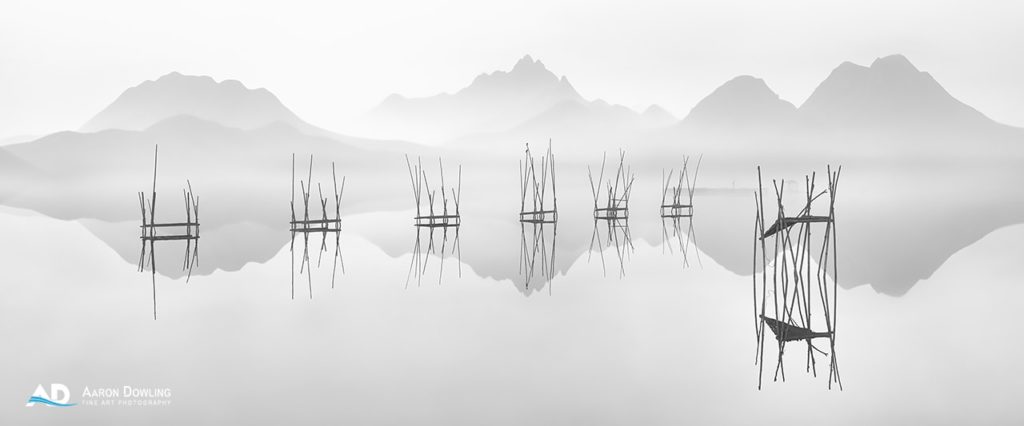
Image creation can be a fun process and create some really striking final images, which of course can’t be emulated as the actual location does not exist. The greatest benefits of pushing the boundaries in post processing on top of unique imagery, is that you learn a great deal about editing which can be applied to more simple edits and it starts to make you think a lot more about the photos you take in the field. You will actually start to think about the possibility of an image in post production while you’re shooting and it will start to change the way you look at scenes. I hope this article has given you some inspiration, or at least something to think about the next time you’re in the field or opening Photoshop.
“The only limits in our photography and creativity, are those that we put on ourselves.” Aaron Dowling